
How Can You Fix Error Code 0xc000000e in Windows 10
Solution 1: Check Physical Device Connections
This is the easiest but most overlooked solution.
When your computer boots into error 0xc000000e, you can first check if there are any other devices that are connected to your computer.
Why do you need to do this check?
That’s because the configuration of the BIOS or UEFI might be configured in such a way that any external device attached has a higher boot priority than that of the hard disk. If so, your computer may try to boot from the externally attached disk but not the drive that contains your operating system. And then, your computer might boot into error 0xc000000e.
We suggest checking these devices: external USB storage devices, pen drives, CDs, DVDs, etc.
However, if your computer still can’t boot normally after checking these devices, you will need to take some other measures to get rid of the error 0xc000000e. You can keep on reading.
Solution 2: Rebuild Boot Configuration Data File
Boot Configuration Data, which is also known as BCD, contains the boot configuration parameters about how to start your Windows OS. If the configuration file is corrupted, your Windows 10 will fail to boot like Windows 10 boots into error 0xc000000e.
To fix the corrupted configuration file, you need to rebuild BCD on your computer.
Since your Windows is unbootable now, you need to create a bootable USB medium from ISO for Windows 10 and then boot from it. After that, you can follow these steps to rebuild BCD on your computer.
1. Click Next when you see the first screen after booting your computer from the bootable USB medium.
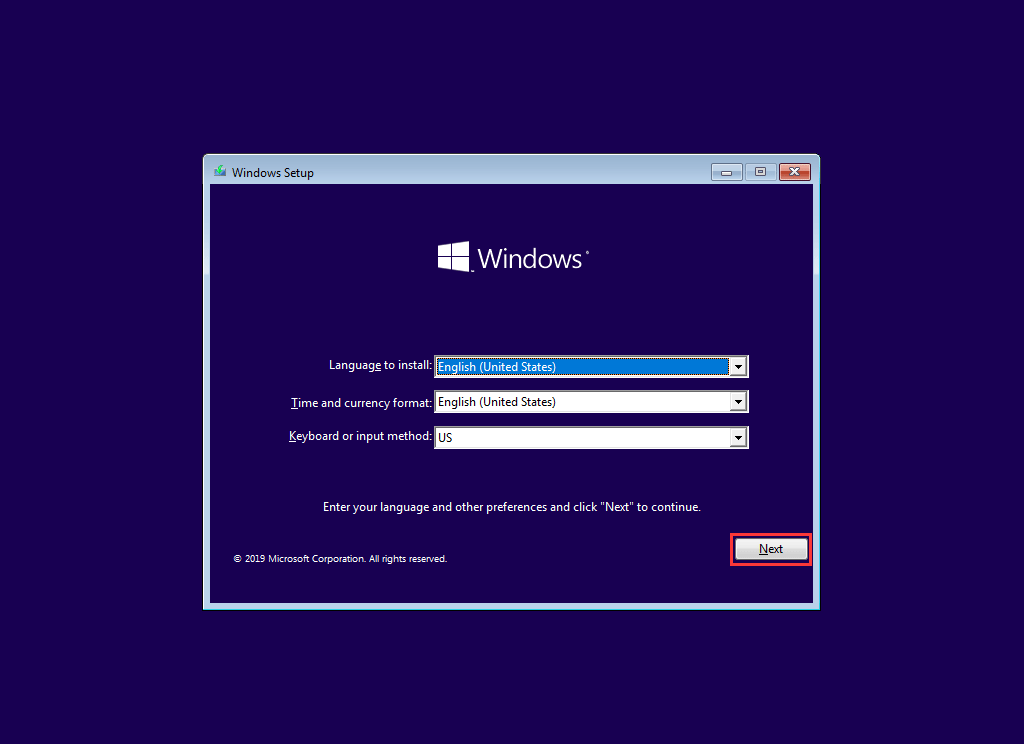
2. You will see the Install now But, you should not press the Install now button. You need to press the Repair your computer link that is on the lower-left corner instead to continue.

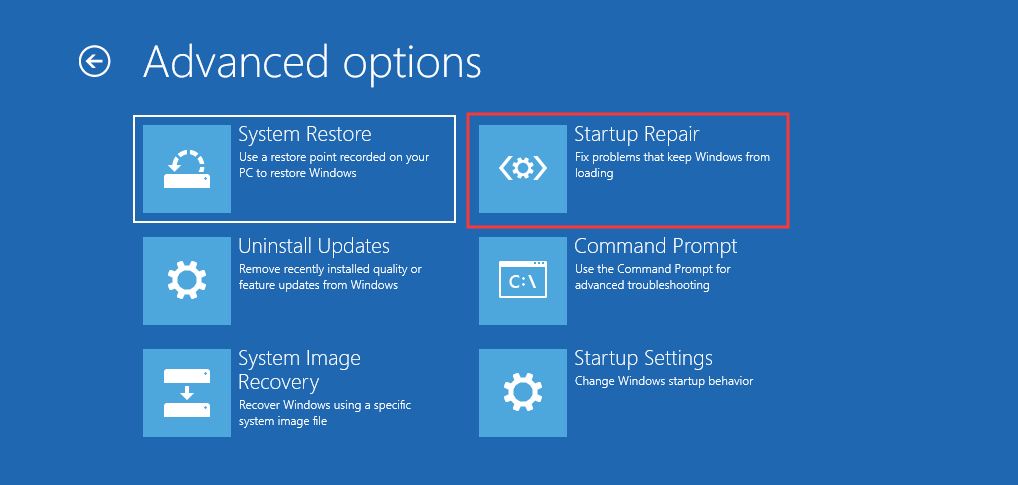
3. Go to Troubleshoot > Advanced options > Command Prompt.

4. Choose the account you are using to continue.
5. If you have set a password for your computer, input it to continue.
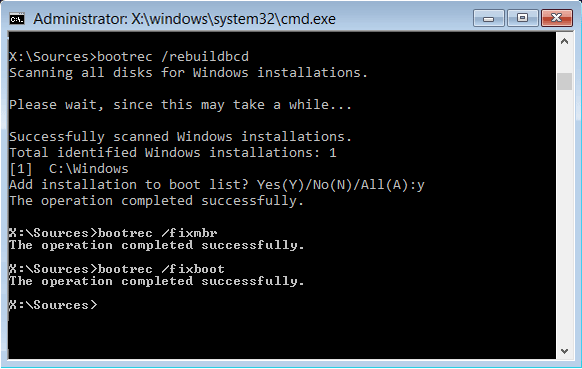
6. Type in the following command and press Enter:
bootrec /rebuildbcd
7. When a Windows installation is found, you need to press Y on the keyboard to let it boot from the list. This will rebuild BCD.
8. When the operation completes, you need to type in bootrec /fixmbr and bootrec /fixboot successively and press Enter after each command.
When the whole process ends, you can reboot your computer to see whether it can boot without error 0xc000000e.
If rebuilding BCD can’t fix error 0xc000000e, you can perform Windows Startup Repair to have a try.
Solution 3: Run Windows Startup Repair
Startup Repair is capable of diagnosing and fixing the found issues. For example, it can automatically scan system files, registry settings, configuration settings, etc. and try to fix the problem on its own. Startup Repair is especially useful when your computer is unbootable.
Since your computer fails to boot, Windows can boot into WinRE automatically. While, if it doesn’t appear, you can interrupt the boot process three times in a row and then the WinRE screen appears.
Alternatively, if you have a bootable USB medium, you can also set your computer to boot from it and go to Repair your computer to enter WinRE.
Then, you should go to Troubleshoot > Advanced options > Startup Repair.
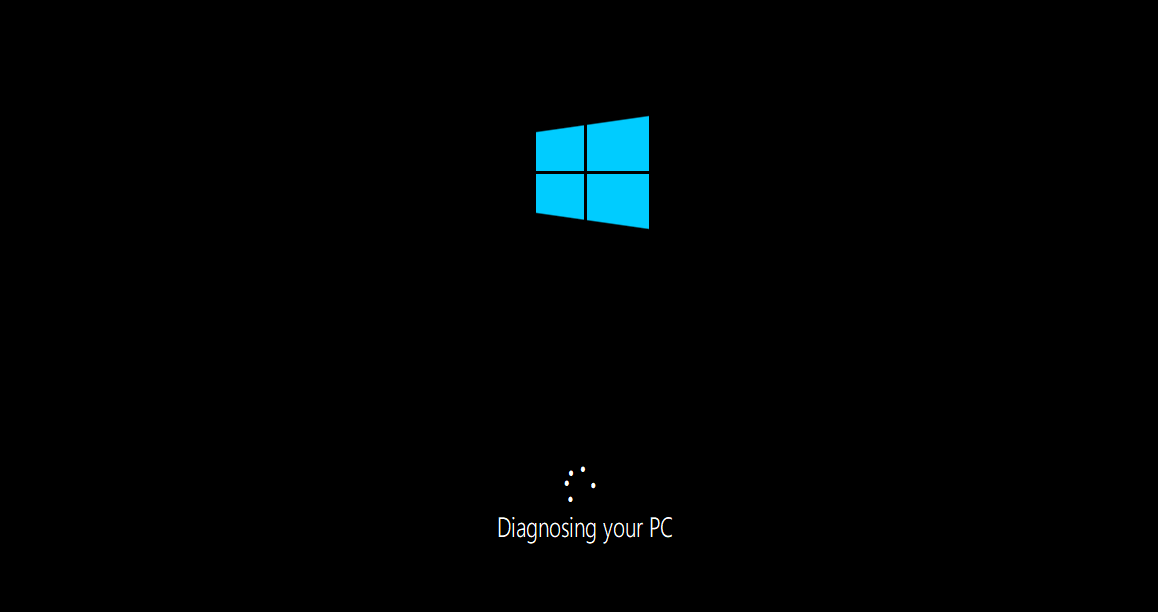
Windows will begin to diagnose your computer automatically. When the process ends, your computer will restart automatically. You can wait to see whether it can boot successfully.
If Windows Startup Repair can’t solve your issue, you need to try the next solution.
Solution 4: Enable Windows 8.1/10 WHQL Support in BIOS
The Windows 8.1/10 WHQL Support setting exists in some of the OEMs. It has two basic functions: checks for signed drivers during the boot process and allows you to enable UEFI support.
If you are using Windows 8.1/10, you need to enable it and then your computer can boot normally. However, if it is not selected, your computer may boot into error 0xc000000e.
So, you can access BIOS to see whether the Windows 8.1/10 WHQL Support setting is enabled. If not, enable it to have a try.
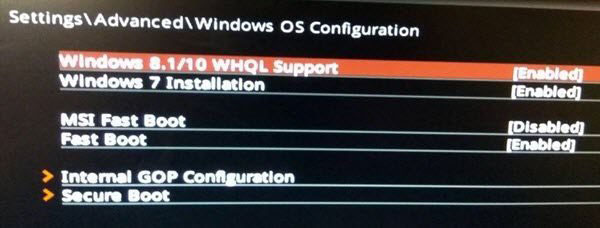
You should note that the Windows 8.1/10 WHQL Support setting is not supported in all computers. If your computer doesn’t have it, you can go to check whether the UEFI support is enabled on your computer. If not, you can enable it to see whether the error code 0xc000000e disappears.
If Windows 10 boot error 0xc000000e still appears after enabling the Windows 8.1/10 WHQL Support setting or UEFI support, you may need to reset the BIOS/UEFI configuration on your computer.
Solution 5: Reset the BIOS/UEFI Configuration
Some users said that their error 0xc000000e issue is solved by resetting the BIOS/UEFI configuration. So, you can consider trying this method to see whether this issue can be solved.
Solution 6: Mark Boot Disk as Online
When the boot disk is marked as offline by mistake, your computer will definitely fail to boot. Windows 10 boot error 0xc000000e is one form of manifestation. In a situation like this, you need to mark that disk as online to make your computer boot successfully.
You still need to use a bootable USB medium to do this job. We will show you a step-by-step guide here:
1. After booting your computer from the bootable USB drive, you need to go to Next > Repair your computer. Then, you will enter WinRE.
2. Go to Troubleshoot > Advanced options > Command Prompt.
3. Select your user account and input the password to continue.
4. Type in diskpart into the Command Prompt window and press Enter to initiate the Diskpart utility inside of the Command Prompt.
5. Type in list disk or list volume, and press Enter to list all the disks or partitions on the computer.
6. Type in select disk * or select volume *, and press Enter to select the needed disk or partition that contains the operating system.
7. Type in online disk or online volume, and press Enter to mark the selected disk or partition as Online.
8. Type exit and press Enter to leave diskpart.

9. Close the Command Prompt window.
After these steps, you can reboot your computer to see whether the error 0xc000000e disappears.
If unfortunately you are still bothered by this error, you will need to reinstall your Windows.
Solution 7: Rescue Your Data and Reinstall Windows
Step 1: Rescue Your Data on the Computer
To keep your computer data safe, you’d better rescue them from your computer using third-party data recovery software.
You can consider using MiniTool Power Data Recovery because it is a professional data recovery software and the bootable edition enables you to recover your data from an unbootable computer.
You need to use a MiniTool snap-in WinPE bootable builder to create a bootable medium that allows you to boot your computer into MiniTool Power Data Recovery Bootable Edition.
You need to access the MiniTool official store to select a suitable edition that contains a bootable builder for further use. Additionally, you also need to prepare an external USB storage drive with enough capacity to save your data.
You can follow these two guides to create a bootable medium on a normal working computer and then set your computer to boot from that medium:
- How to Build Boot CD/DVD Discs and Boot Flash Drive with Bootable Media Builder?
- How to Boot from Burned MiniTool Bootable CD/DVD Discs or USB Flash Drive?
When the computer enters the MiniTool Power Data Recovery Bootable Edition, you can follow these steps to rescue your data:
1. Connect the external drive to your computer via a USB cable.
2. Stay at the This PC interface and click the drive that contains your needed data.
3. Click the Scan button to start scanning the selected drive.

4. It will take a while to scan the whole drive. You need to be patient until the whole scanning process ends. Then, you will see the scan results as follows.

5. Select your needed files to continue.
6. Click Save and then select the connected external drive to save the selected files.
Now, your needed files are saved to the external storage drive. You can close this software, shut down the computer, and then reinstall Windows 10 on your computer.
Perform Windows Reinstallation
You still need to use the bootable USB medium to perform a Windows 10 reinstallation.
1. Set your computer to boot from the bootable USB drive.
2. When you see the first page after booting, click Next to continue.
3. Click Install now.
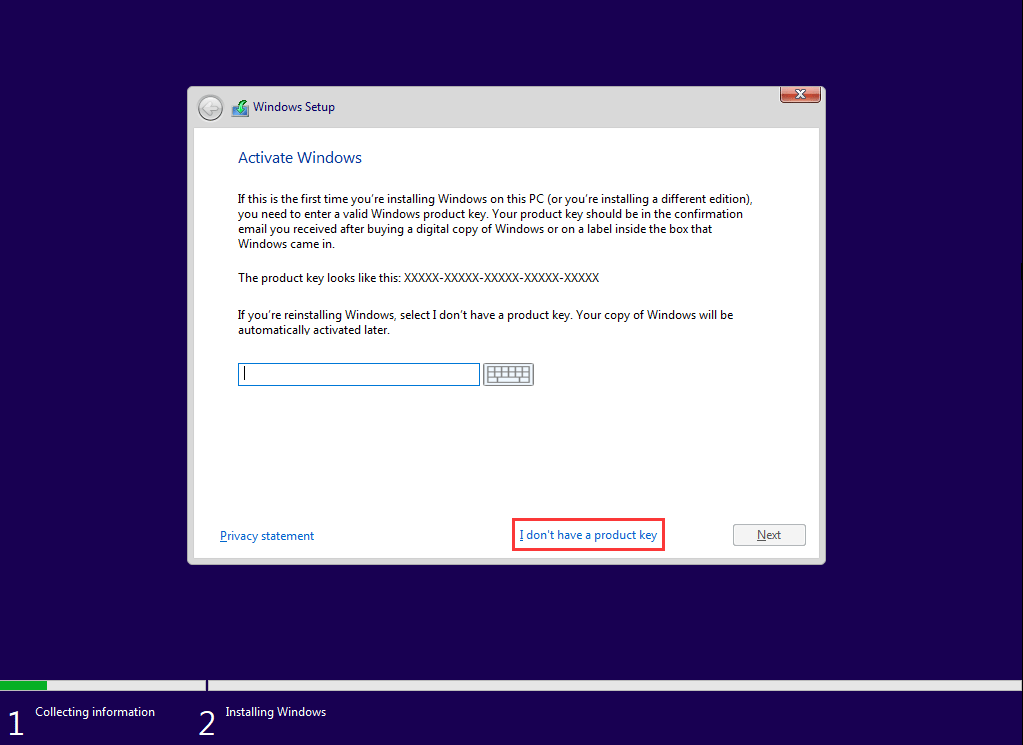
4. Since your operating system has already been activated, you can click the I don't have a product key link to enter the next page.
5. Select your needed operating system and press Next.

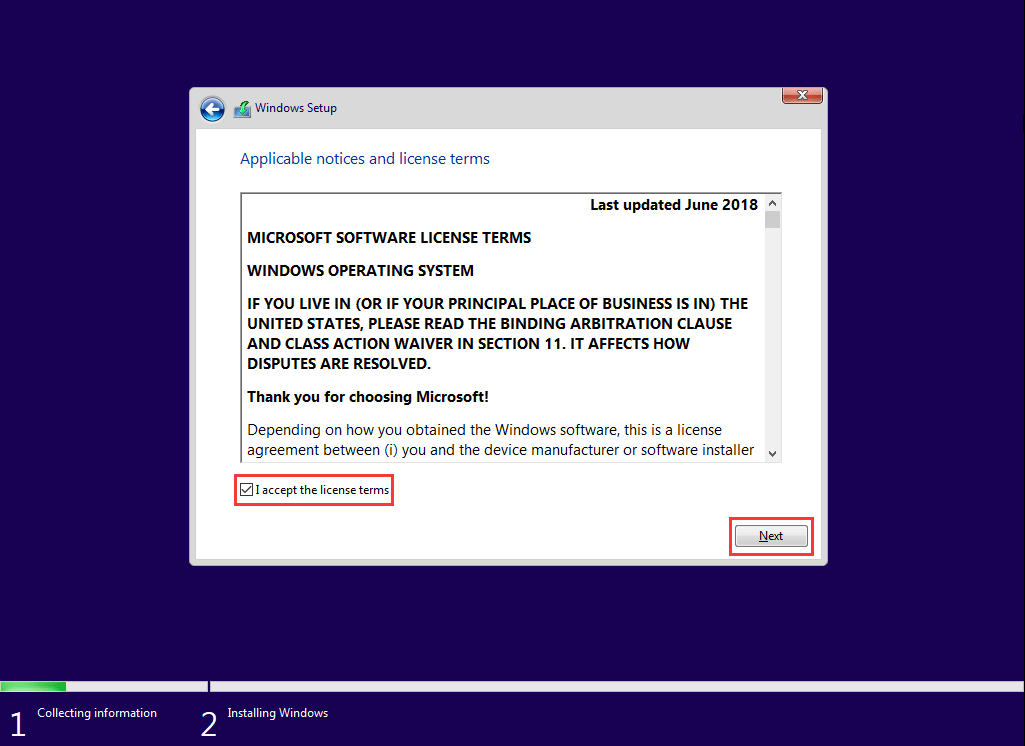
6. Check I accept the license terms.
7. Click Next.
8. Select Custom: Install Windows only (advanced).

9. On the following page, you need to select the drive you need to install Windows 10. Usually, it is Drive 0. Just select it and then click Delete to remove the partition from the hard drive.
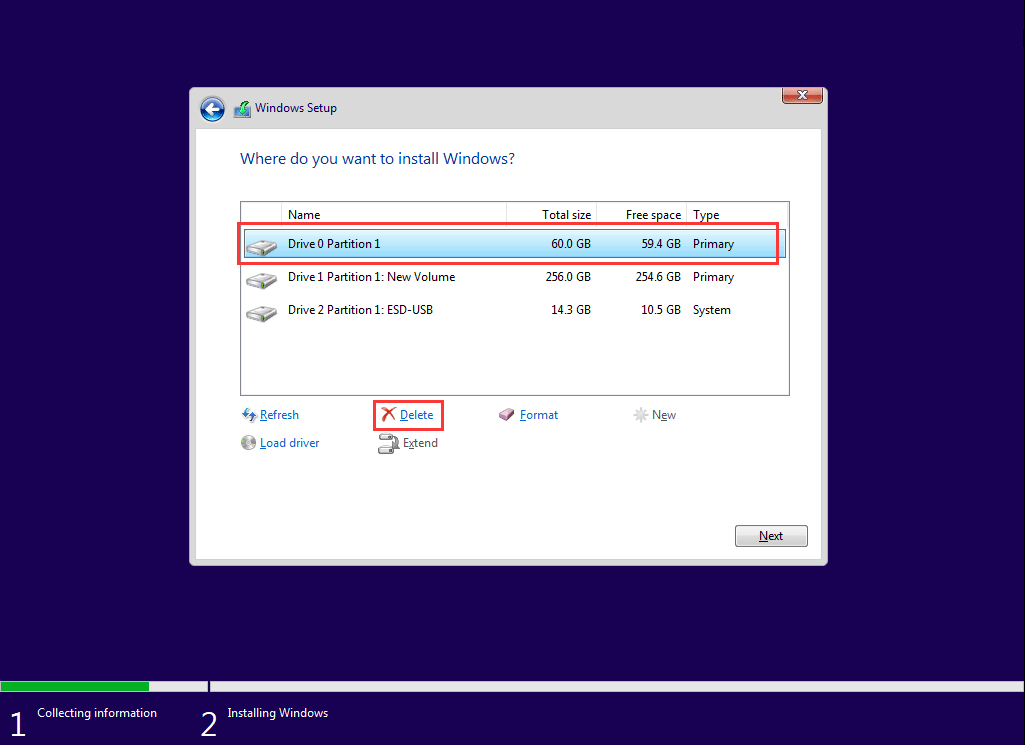
10. Click OK.
11. Choose the empty partition.
12. Click Next.
The Windows reinstallation process will begin. After that, you can create a new account and set up the environment based on your actual requirements.
When the entire Windows reinstallation process ends, your computer can boot normally.
We hope these solutions can solve your issue effectively.